
* 현재 js 코드 *
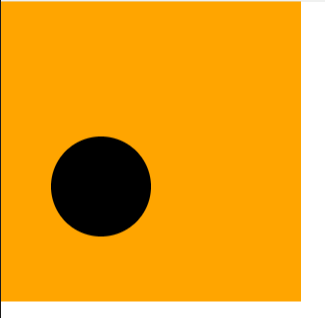
이번엔 파티클을 그리기 위해 arc 메서드를 사용한다.
먼저 ctx.beginPath()로 Path를 그릴 것을 선언한다.
ctx.arc()로 원을 그린다. https://developer.mozilla.org/en-US/docs/Web/API/CanvasRenderingContext2D/arc
끝날 땐 closePath()를 해준다.

색상을 바꾸고 싶을 땐 fill전에 fillStyle을 사용하면 된다.
fill대신 stroke를 사용하면 테두리만 있는 도형을 그릴 수 있다.
이 파티클을 애니매이션 효과로 나타내려면 프레임마다 x, y 위치를 다른 곳으로 옮겨주면 된다.
파티클 여러개를 동시에 관리하기 위해 Particle 클래스를 만들고 그 안에 constructor라는 메서드를 정의한다. constructor(생성자)는 클래스의 인스턴스가 생성될 때 호출되며 객체의 초기화를 담당한다.
그리고 위에서 원을 그렸던 코드들을 draw() 메서드 안으로 옮겨준다.
arc메서드의 x, y, r 부분은 다음처럼 바꾼다.
새로운 파티클 인스턴스를 생성한다. x, y, r은 변수로 따로 선언해둔다.
이렇게 인스턴스를 생성하고 Particle 클래스의 draw() 메서드를 선언하면 아까처럼 원이 그려진다.
이제 본격적으로 애니메이션 효과를 만들어보자.
animate 함수를 만들고 그 안에 window.requestAnimationFrame으로 animate 함수를 불러주면 매 프레임마다 animate 함수가 실행된다.
잘 실행되는지 확인하기 위해 animate 안에서 콘솔로 1을 찍고 animate() 함수를 실행해본다.
그럼 이렇게 1이 계속 찍히고 있는 것을 볼 수 있다.
particle.draw()를 animate 함수 안에서 실행하면 매 프레임마다 draw() 함수가 실행될 것이다.
하지만 이렇게 하면 원 위에 계속 원이 그려진다. 원을 그리고 다시 지우고 새 원을 그리게 하기 위해서 ctx.clearRect()를 사용한다.
이렇게 작성하면 아직 티는 안나지만 매 프레임마다 전체 화면을 지우고 새로 그려진다.
여기서 requestAnimationFrame은 현재 디스플레이의 재생률에 따라 1초에 찍히는 프레임의 수가 다르다. 예를 들어 재생률이 60Hz인 디스플레이에서는 초당 60프레임이 실행되고(requestAnimationFrame이 60번 실행) 144Hz인 디스플레이에서는 초당 144프레임이 찍힌다. 따라서 모든 모니터에서 같은 시간에 같은 길이만큼 실행되진 않는다는 것이다. 모든 모니터에서 같은 시간에 같은 길이만큼 애니메이션을 실행시키기 위해서는 프레임 간의 시간 차이를 계산하고 그 시간 차이에 따라 애니메이션의 진행을 조절해야 한다.
만약 내 디스플레이의 fps(초당 프레임 수)가 60Hz이고, 애니메이션의 fps를 10으로 하고 싶다면 100ms마다 requestAnimationFrame를 실행시켜야 한다. 이 100ms를 interval이란 변수에 담아 생성한다. 그리고 requestAnimationFrame가 한번 실행될 때마다의 현재시간을 now 변수에, 처음 실행될 때의 시간을 then 변수에 담는다. 내 모니터의 재생률이 60Hz이므로 한번 실행될때마다 약 16ms씩 증가할 것이다. 이 now의 값과 then 값의 차를 delta 변수에 담는다. delta값은 16, 32, 48, ..이 된다. 이 delta 값이 interval 값보다 커질 때 애니메이션을 동작시키면 된다. 그 다음 then의 값을 now - (delta % interval)로 바꿔준다.
목표 fps를 60으로 하고 코드를 작성해보자.
먼저 interval, now, delta, then을 선언한다.
그리고 위에서 말한 설명대로 animate함수 안에 작성한다.
이렇게 함으로써 delta값이 interval보다 커질 때마다 아래에 구현한 애니메이션 효과가 실행된다.
확인해보기 위해 파티클의 y값을 1씩 증가시킨다.
원이 아래도 이동한다. 캔버스를 벗어나면 원이 보이지 않는다. 캔버스의 사이즈를 전체 화면으로 바꾼다.
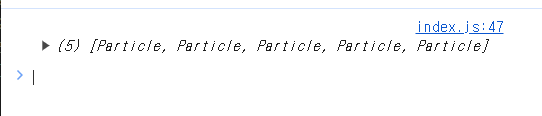
이제 파티클을 한 개가 아닌 여러개를 생성한다.
그리고 랜덤한 위치에서 생성시키기 위해 randomNumBetween 변수를 선언한다.
이제 for문 안에서 랜덤한 파티클을 선언한다.
x는 0부터 전체 화면의 가로길이까지, y는 0부터 전체 화면의 세로길이까지, 반지름은 50에서 100 사이의 랜덤한 파티클이 나타나게 하였다. 이렇게 for문 안에서만 정의하면 아무 일도 일어나지 않기 때문에 빈 파티클 배열을 만들고 for문 안에서 생성된 파티클들을 배열 안에 담는다.
이렇게 생성된 파티클들의 배열을 콘솔로 찍어 확인해본다.
잘 생성되었으니 이제 animate안에서 draw로 그리면 된다.
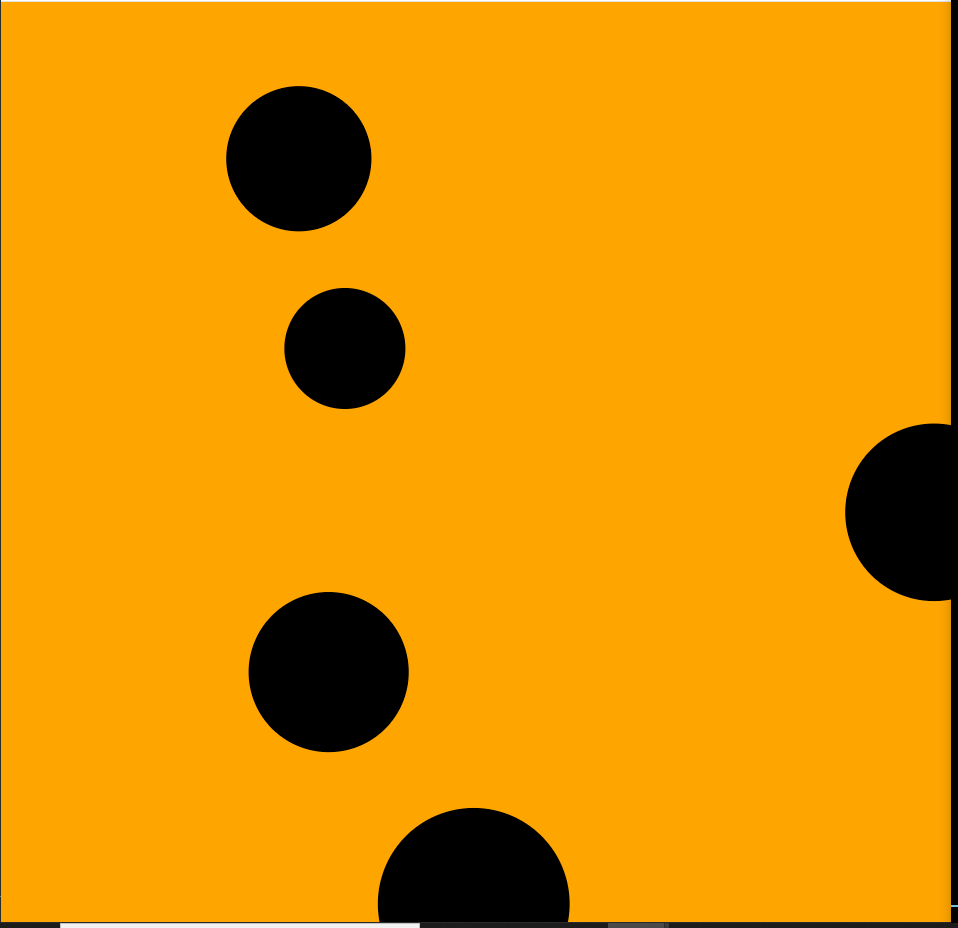
새로고침할 때마다 랜덤한 위치에 파티클들이 그려진다.
이제 각각의 파티클들이 움직이는 효과를 내기 위해 클래스 안에 update() 함수를 생성하고 그 안에서 각 파티클들의 초기화 값을 변경시킨다.
파티클들이 draw되기 전에 update를 시켜주면 파티클들이 아래로 움직인다.
파티클들이 각각 다른 속도로 떨어지게 해보자.
파티클 생성자에서 vy라는 변수도 받게 하고 파티클을 생성할 때 각각 랜덤한 vy를 가지게 한다.
그리고 update할 때마다 1 대신 이 vy값을 더해주면 된다.
이제 파티클이 캔버스 밖까지 나가면 다시 위에서 떨어지게 해주자.
파티클을 그리고 나서 y 값이 캔버스 맨 아래 값 즉 canvasHeight의 값보다 커지면 y 값을 0으로 초기화시키면 된다.
이때 ctx.arc의 y값은 원의 중심 좌표의 y값이기 때문에 원이 완전히 사라졌을 때가 아니라 원의 중심이 맨 아래에 도달했을 때 원이 사라지게 되고 위에서 재생성될 때도 원의 절반부터 보인다. 더 자연스러운 효과를 주기위해 y-r값이 맨 아래 도달했을 때 y를 -r로 초기화한다.
재생성될 때도 랜덤한 위치에서 랜덤한 크기로 생성되도록 바꿔보자.
이제 가속도를 추가해보자.
생성자에 acc 변수를 추가하고 update에서 vy에 acc를 곱해주면 중력의 영향을 받는 것처럼 파티클들이 빠르게 떨어진다. 이때 acc의 값은 1보다 조금 큰 값으로 설정한다.
acc값을 1보다 작은 값으로 바꿔보면 파티클들이 서서히 멈추는 듯한 효과가 된다. 속도가 0으로 수렴하기 때문이다.
* 최종 코드 *
const canvas = document.querySelector('canvas')
const ctx = canvas.getContext('2d')
const dpr = window.devicePixelRatio

const canvasWidth = innerWidth
const canvasHeight = innerHeight

canvas.style.width = canvasWidth + 'px'
canvas.style.height = canvasHeight + 'px'

canvas.width = canvasWidth * dpr
canvas.height = canvasHeight * dpr
ctx.scale(dpr, dpr)

class Particle {
  constructor(x, y, r, vy) {
    this.x = x
    this.y = y
    this.r = r
    this.vy = vy
    this.acc = 1.05
  }
  update() {
    this.vy *= this.acc
    this.y += this.vy
  }
  draw() {
    ctx.beginPath()
    ctx.arc(this.x, this.y, this.r, 0, Math.PI / 180 * 360)
    ctx.fill()
    ctx.closePath()
  }
}

const Total = 5;
const randomNumBetween = (min, max) => {
  return Math.random() * (max - min + 1) + min
}
let particles = []

for (let i = 0; i < Total; i++) {
  const x = randomNumBetween(0, canvasWidth)
  const y = randomNumBetween(0, canvasHeight)
  const r = randomNumBetween(50, 100)
  const vy = randomNumBetween(1, 5)
  const particle = new Particle(x, y, r, vy)
  particles.push(particle)
}

console.log(particles);

let interval = 1000 / 60
let now, delta
let then = Date.now()

function animate() {
  window.requestAnimationFrame(animate)
  now = Date.now()
  delta = now - then

  if (delta < interval) return

  ctx.clearRect(0, 0, canvasWidth, canvasHeight)

  particles.forEach(particle => {
    particle.update()
    particle.draw()

    if (particle.y - particle.r > canvasHeight) {
      particle.y = -particle.r
      particle.x = randomNumBetween(0, canvasWidth)
      particle.r = randomNumBetween(50, 100)
      particle.vy = randomNumBetween(1, 5)
    }
  })

  then = now - (delta & interval)
}

animate()'Canvas' 카테고리의 다른 글
| [Canvas] 캔버스 resize (0) | 2024.05.22 |
|---|---|
| [Canvas] dat.GUI 사용하기 (0) | 2024.05.22 |
| [Canvas] svg 필터 입히기(feGaussianBlur, feColorMatrix) | Gooey Effect (0) | 2024.05.21 |
| [Canvas] window.devicePixelRatio (dpr) (3) | 2024.04.18 |
| [Canvas] 캔버스 사용하기 | 캔버스 사이즈 | fillRect() (51) | 2024.04.14 |