Frontend/React

[React] TicTacToe앱 만들기(3) - 게임 동작 기록, jumpTo()

gamzaggang7 2024. 6. 20. 21:38
728x90

1. 게임 동작 기록하기

게임 동작을 기록하기 위해 History 배열을 생성하고 squares 배열이 동작할 때마다 squares 배열을 history 배열에 저장한다.

우선 최상위 컴포넌트에 history state를 추가하고, Board 컴포넌트의 sIsNext state와 winner 관련 코드들을 최상위 컴포넌트로 옮긴다.

function App() {
  const [history, setHistory] = useState([{ squares: Array(9).fill(null) }]);
  const [xIsNext, setXIsNext] = useState(true);
 
  const calculateWinner = (squares) => {
    const lines = [
      [0, 1, 2],
      [3, 4, 5],
      [6, 7, 8],
      [0, 3, 6],
      [1, 4, 7],
      [2, 5, 8],
      [0, 4, 8],
      [2, 4, 6]
    ]

    for (let i = 0; i < lines.length; i++) {
      const [a, b, c] = lines[i];
      if (squares[a] && squares[a] === squares[b] && squares[a] === squares[c])
        return squares[a];
    }

    return null;
  }

  const winner = calculateWinner(squares);
 
  let status;
  if (winner) {
    status = 'Winner: ' + winner;
  } else {
    status = `Next player: ${xIsNext ? 'X' : 'O'}`;
  }

App 컴포넌트에는 squares를 선언하지 않았기 때문에 winner 변수 선언 부분에서 에러가 난다. 잘 작동하도록 현재 squares를 current 변수에 담고 current에 저장된 배열로 승패를 계산한다.

  const current = history[history.length - 1];
  const winner = calculateWinner(current.squares);


handleClick 함수도 App 컴포넌트로 이동시킨다.

  const handleClick = (i) => {
    const newSquares = current.squares.slice();

    if (calculateWinner(newSquares) || newSquares[i]) {
      return;
    }

    newSquares[i] = xIsNext ? 'X' : 'O';
    setHistory([...history, { squares: newSquares }])
    setXIsNext(!xIsNext);
  }

새로운 게임 상태를 기존의 history 배열에 추가한다. 즉 setHistory는 게임 기록을 업데이트하는 역할을 한다.


이제 App 컴포넌트의 함수와 state를 Board 컴포넌트로 내려준다.

<Board squares={current.squares} onClick={(i)=>handleClick(i)} />

Board 컴포넌트에 squares와 onClick props를 전달한다. 각 칸을 클릭하면 handleClick 함수를 호출한다.

const Board = ({squares, onClick}) => {
  const renderSquare = (i) => {
    return <Square value={squares[i]} onClick={() => onClick(i)} />
  }


status 부분은 App의 game-info 안으로 옮긴다.
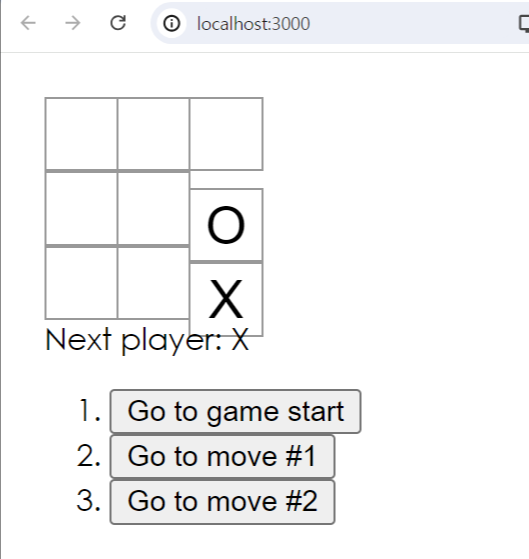
        <div className="game-info">
          <div className="status">{status}</div>
        </div>


2.  과거 이동 표시 (map)

게임 동작을 기록한 것(history 배열)을 map 메서드를 이용해 앱에 표시한다.

  const handleClick = (i) => {
    ...
  }

  const moves = history.map((step, move) => {
    const desc = move ? 'Go to move #' + move : 'Go to game start';
 
    return (
      <li>
        <button>{desc}</button>
      </li>
    )
  })

여기서 move는 인덱스를 뜻한다.

status 밑에 moves를 표시한다.

        <div className="game-info">
          <div className="status">{status}</div>
          <ol>{moves}</ol>
        </div>


App.js:69
Warning: Each child in a list should have a unique "key" prop.

위 에러를 해결하기 위해 key값을 넣는다.

리액트에서 요소의 리스트를 나열할 때는 key를 넣어주어야 한다. key는 리액트가 변경, 추가, 삭제된 항목을 식별하는 데에 도움을 준다. key 값은 고유한 값이어야 한다.

      <li key={move}>
        <button>{desc}</button>
      </li>


3. jumpTo()

게임 기록을 클릭하면 해당 스텝으로 돌아가는 함수를 작성한다.

우선 기록버튼 클릭 시 jumpTo함수가 동작하도록 onClick을 붙인다.

      <li key={move}>
        <button onClick={() => jumpTo(move)}>{desc}</button>
      </li>


현재 몇 번째 스텝인지 알 수 있는 state를 생성한다.

  const [stepNumber, setStepNumber] = useState(0);
  const jumpTo = (step) => {
    setStepNumber(step);
    setXIsNext((step % 2) === 0);
  }
  • setStepNumber(step): 현재 턴을 step으로 설정한다. step이 3이라면 게임의 현재 상태를 세 번째 턴으로 설정한다.
  • setXIsNext((step % 2) === 0): 현재 턴이 누구의 턴인지 설정한다. step이 짝수면 X, 홀수면 O의 턴으로 설정한다.

해당 step으로 돌아가면 history도 그 때의 상태로 돌아가야 한다. 3번째 턴으로 돌아간다면 그 이후의 history들은 삭제되어야한다. handleClick()안에 newHistory, newCurrent 변수를 생성한다.

  const handleClick = (i) => {
    const newHistory = history.slice(0, stepNumber + 1);
    const newCurrent = newHistory[newHistory.length - 1];
    const newSquares = newCurrent.squares.slice();

    if (calculateWinner(newSquares) || newSquares[i]) {
      return;
    }

    newSquares[i] = xIsNext ? 'X' : 'O';
    setHistory([...newHistory, { squares: newSquares }])
    setXIsNext(!xIsNext);

    setStepNumber(newHistory.length)
  }
  const current = history[stepNumber];

move 버튼을 클릭하면 해당 step으로 잘 돌아가긴 하지만 moves 목록이 곧바로 갱신되지 않고 square를 한 번 클릭해야 갱신된다. 현재 코드는 moves 배열을 생성할 때 전체 history를 기반으로 생성하고 있어 jumpTo 함수로 특정 step으로 이동해도 기존의 모든 move 버튼들이 유지된다. 

이를 해결하기 위해 moves 배열에서 현재 stepNumber 까지만 보여주도록 수정한다.

  const moves = history.slice(0, stepNumber + 1).map((step, move) => {

이렇게 히면 move 버튼을 클릭하면 jumpTo함수로 인해 stepNumber가 특정 step으로 바뀌면서 history 배열또한 바뀐 stepNumber까지만 slice된다. 즉 move 버튼 클릭과 동시에 현재 게임 진행 상태에 맞는 move 버튼들만 보이게 된다.


4. css 스타일링

728x90